Laser Cut Name Plate Necklaces
Posted by Outfab Team on
Ever wondered how to make those cool laser cut name plate necklaces everyone seems to be wearing? It is actually quite easy! You must have some knowledge of graphic design. If there is a term you don't know, just google it and you will find many other tutorials on what that function does or what it's called in your program.
You need the following supplies:
Craft Glue
Pliers
Jumprings
Chain
Vector graphics program such as Inkscape, CorelDRAW, or Illustrator.
Inkscape is free at www.Inkscape.org and a great starter program for anyone new to designing for laser cutting.
Step 1:
In your vector graphics program, choose a font. It's a hard choice! So many good ones.

Step 2:
Outline your font in blue hairline. This is what the laser reads as cutting lines. You can stop here, but it will be very difficult to glue all these individual letters onto a back plate, so we're going to squeeze them together and connect them.

Step 3:
Adjust the kerning on the letters so they are all touching, even the dot on the "i". Now we have to merge all the letters together because the laser will cut EVERY blue line and this would turn into a chopped up mess.

Step 4:
Merge letters together. This is called different things in different programs. Weld, Union, Merge, you get the idea! Just find a way that all the letters are stuck together and the blue cutting line will give you what you want. Careful choosing a font, some are SO delicate, they will simply disintegrate when cutting. You can add a small contour at this stage to sturdy your text. See this post about cutting delicate text.

Step 5:
Now to make that perfect outline for the backing piece! Again, this function is called different things in different programs. Contour, Offset, Outset, you get the idea! It looks good, but we don't want this to all cut together out of the same material. So you need to unlink the contour from the main text and set it aside.

Step 6:
Separate your contoured piece and decide on final size. If you're not sure, print your design at actual size and see if that looks good. We're going with two and half inches on this example. It's important to decide on final size before adding jump ring holes. A good rule of thumb for holes if you have a 6mm 18 guage jumpring, is a .063" hole .152" from the edge.

Step 7:
Complete your layouts. You can fit as many pieces as you want onto a 12"6" unit of acrylic, so we're going to make many more custom laser cut name plate necklaces and badges for all our friends!

This is the layout for mirror acrylic. Notice how it is flipped. The art board is 6"x12"

This is the layout for the neon pink acrylic. Some have holes, others do not. We're going to make pins AND necklaces! Some mermaid necklaces will have hanging laser cut seashell charms, others wont.
Step 8:
Place your order! Upload your files onto the material of choice and check out. After some time, you will receive your pieces in the mail. You can save these layouts to cut in other colors later.
Step 9:
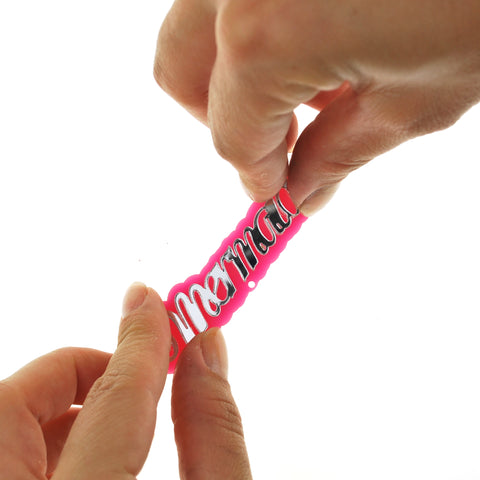
Assemble your necklaces! You need glue, pliers, jump rings, and chain. Note we do not sell any of these materials or provide assembly of any kind.

Glue the delicate name onto the backing.

Press it down onto the backing plate.
Attach the chains with jump rings.

Attach the hanging charm.
That's it! You're done! Now assemble the other pieces from your layout and either sell them or give them to your friends as wonderful, unique, laser cut gifts that you have designed!
